How to add GPT to any website for free?
1. Get Access to the Open Custom GPT Platform
You have two ways to access the platform that lets you create and embed your own GPT-based chatbot.
Option 1: Self-Host
What it means: You download the open-source code (usually from GitHub) and run it locally on your own machine.
Why choose this:
Full control over your data and configuration.
No dependency on a third-party hosting service.
Useful for developers or organizations that want privacy or customization.
How to do it:
Clone or download the repository (e.g.,
git clone https://github.com/...).Install dependencies (e.g.,
npm installorpip install -r requirements.txt).Run the project locally (e.g.,
npm run devorpython app.py).Access it in your browser via
http://localhost:3000or similar.
Option 2: Hosted Version
What it means: You use a publicly hosted version of the interface — no installation or setup required.
Why choose this:
Simplifies the process; ideal for non-technical users.
You can start creating your GPT immediately.
How to do it:
Visit the provided hosted link (often listed in the video description).
It loads a web interface similar to OpenAI’s Custom GPT editor.
2. Set Your OpenAI API Key
What it does: Connects the interface to your personal OpenAI account.
Why it matters: Without this, the assistant cannot access GPT models or generate responses.
How to do it:
In your OpenAI account settings, create a new API key.
Copy the key and paste it into the “Set API Key” field within the interface.
The platform will now authenticate your requests to OpenAI’s API.
Note: You’ll be billed through your OpenAI account for the model’s usage (based on API calls).
3. Create a New Assistant
How: Click “Create Assistant” or “New Custom GPT” inside the interface.
Purpose: This sets up a distinct chatbot entity that you can personalize and later embed.
4. Configure the Assistant
This step defines what your GPT does and how it behaves.
a. Name
Choose a clear, descriptive name (e.g., “Demo GPT,” “Legal FAQ Bot,” “Product Support Assistant”).
b. Instructions (Prompt)
These define the assistant’s personality, scope, and tone.
Example:
You are a friendly, concise product support assistant for Acme Electronics.
Always answer clearly and helpfully, referring users to official documentation when needed.
You can copy prompts from other Custom GPTs or create your own detailed specification.
c. Upload Knowledge Files
Upload PDFs, docs, or text files the assistant can reference.
Example: a company FAQ, technical manual, or research paper.
These files enhance retrieval-based responses, making the assistant “aware” of specific content.
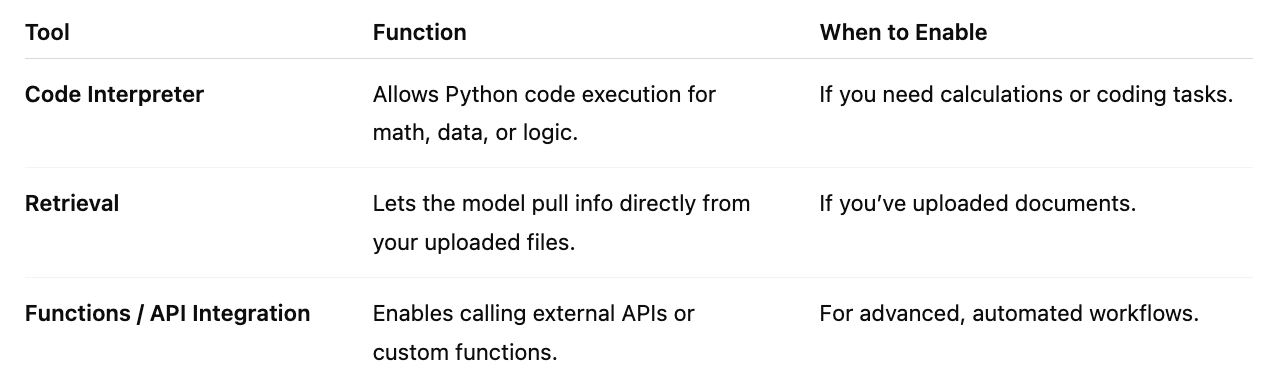
d. Enable Tools
You can activate one or more of the following:
e. Submit
Once your configuration is ready, click Submit.
Your assistant will be deployed and ready for testing.
5. Embed on Your Website
After your GPT is created, the interface provides an embed code.
Option 1: Embed Widget
Click Copy Embed.
Paste the provided
<iframe>or<script>snippet into your website’s HTML where you want the chatbot to appear.Example:
<iframe
  src="https://yourgptsite.com/chat/demo"
  width="100%"
  height="600"
  style="border:none;"
></iframe>
The chat widget will render directly on your site — just like a customer service or AI assistant window.
Option 2: Shareable Link
If embedding isn’t needed, copy the direct share link.
Example:
https://yourgptsite.com/chat/demoShare it via email, social media, or QR code.
6. (Optional) Customize the Interface
If self-hosting, you can:
Modify color themes, branding, and text.
Add user authentication or analytics.
Integrate with backend systems via APIs.
For hosted versions, customization is typically limited to:
Name and logo
Assistant description
Embedded widget dimensions
End Result
Once everything is set up:
You’ll have a fully functional custom GPT chatbot.
It will use your OpenAI API key for intelligence,
Your files and instructions for knowledge, and
Your website or share link for deployment.